Intro and Brief Recap
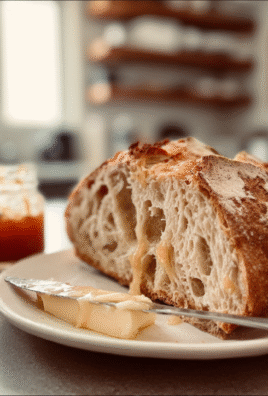
Have you ever tasted fresh, warm pita bread right out of the oven? The moment you tear it apart, releasing the steam and revealing its soft, fluffy interior, is pure bliss. Homemade pita bread offers a delightful combination of flavors and textures that elevates any meal. Whether you are dipping it into hummus or stuffing it with your favorite fillings, each bite brings an irresistible aroma and taste that store-bought versions simply cannot match.
I still remember the first time I made homemade pita bread. It was a chilly Sunday afternoon, and I wanted to create something special for my family. As the dough rose, the warmth of the kitchen filled our home with delicious scents. When we finally took our first bite, laughter and smiles surrounded the table. This homemade pita bread recipe is perfect for gatherings or quiet evenings at home. With just a few simple ingredients and steps, you can create a memorable dish that everyone will love.
Key Ingredients For Homemade Pita Bread
Here’s what you’ll need to make this delicious dish:
- All-Purpose Flour: This flour provides the perfect structure for your pita bread; look for unbleached varieties for the best flavor.
- Active Dry Yeast: Choose fresh yeast to ensure your bread rises well; it’s essential for achieving that classic pocket.
- Warm Water: Use water heated to around 110°F (43°C) to activate the yeast effectively.
- Olive Oil: A bit of olive oil adds richness to the dough; extra virgin is preferred for its superior flavor.
- Salt: Salt enhances all flavors in the dough; use kosher salt for an even distribution.
The full ingredients list, including measurements, is provided in the recipe card directly below.

Instructions For Homemade Pita Bread
Follow these simple steps to prepare this delicious dish:
First Step : Activate The Yeast
In a small bowl, combine warm water with active dry yeast. Allow it to sit for about 5-10 minutes until it becomes frothy, indicating that the yeast is active.
Second Step : Prepare The Dough
In a large mixing bowl, whisk together all-purpose flour and salt. Make a well in the center and pour in the activated yeast mixture along with olive oil. Stir until a shaggy dough forms.
Third Step : Knead The Dough
Transfer the dough onto a lightly floured surface and knead it for about 8-10 minutes until smooth and elastic. If it’s too sticky, add a little more flour as needed.
Fourth Step : Let It Rise
Place the kneaded dough into a greased bowl, cover it with a damp cloth, and let it rise in a warm area for approximately 1 hour or until doubled in size.
Fifth Step : Shape The Pitas
Once risen, punch down the dough gently. Divide it into equal portions (about 8). Roll each piece into a ball and then flatten them into discs about 1/4 inch thick.
Sixth Step : Bake The Pitas
Preheat your oven to 475°F (245°C) with a baking stone inside if available. Bake each disc for about 3-5 minutes until puffed up and lightly golden.
Transfer to plates and enjoy warm or let cool before storing in an airtight container.
Expert Tips
Here are some helpful tips to ensure the best results for your dish:
- Use Fresh Ingredients: Ensure that your yeast is fresh; expired yeast may not activate properly.
- Knead Thoroughly: Proper kneading develops gluten which helps create that fluffy texture inside each pita pocket.
- Monitor Oven Temperature: An adequately preheated oven ensures pitas puff up correctly during baking.
Presentation Ideas
This Homemade Pita Bread is versatile and pairs wonderfully with:
- Hummus: Enjoy freshly baked pita bread with a smooth and creamy hummus. The soft texture of the bread complements the rich flavors of various hummus varieties, such as roasted red pepper or garlic.
- Salads: Use pita bread to create a delightful salad wrap. Fill it with your favorite greens, grilled vegetables, and proteins like chicken or falafel for a wholesome meal option.
- Dips: Serve your Homemade Pita Bread alongside an assortment of dips such as tzatziki or baba ganoush. This combination makes for an excellent appetizer at gatherings or a satisfying snack at home.
How to Store Homemade Pita Bread
Storing your Homemade Pita Bread properly ensures it remains fresh and delicious. Allow the pita to cool completely before storing. You can keep them in a resealable plastic bag or wrap them in foil. For short-term storage, place them at room temperature for up to three days. If you want to extend their shelf life, consider freezing your pitas. Wrap them tightly in plastic wrap and then place them in an airtight container or freezer bag. When you’re ready to enjoy them, simply thaw at room temperature and warm in the oven for a few minutes.
Tips for Perfect Pita Bread
To achieve the best results with your Homemade Pita Bread, consider these helpful tips:
– Ensure your water is warm but not hot when mixing the yeast. This step activates the yeast without killing it.
– Knead the dough thoroughly for about 10 minutes to develop gluten, which helps create that perfect pocket.
– Let the dough rise in a warm area, covered with a damp cloth. This helps achieve maximum fluffiness.
– Preheat your oven well before baking; using a pizza stone can enhance the pita’s puffiness by providing even heat.
Common Mistakes When Making Pita Bread
Avoid common pitfalls when making Homemade Pita Bread for the best experience:
– Using cold water can hinder yeast activation; always opt for warm water.
– Over-kneading or under-kneading can affect texture. Aim for smooth and elastic dough.
– Not allowing enough time for rising can result in flat pitas; patience is key!
– Skipping preheating can lead to uneven cooking and less puffing.
FAQs:
What is the best way to reheat Homemade Pita Bread?
Reheating your Homemade Pita Bread can restore its soft texture. The best method involves wrapping it in aluminum foil and placing it in a preheated oven at 350°F (175°C) for about 5–10 minutes. Alternatively, you can use a microwave. Place the pita on a microwave-safe plate and cover it with a damp paper towel; heat in short bursts of 15 seconds until warm.
Can I make Homemade Pita Bread ahead of time?
Yes! You can prepare your Homemade Pita Bread ahead of time. After baking, allow the pitas to cool completely before storing them in an airtight container at room temperature for up to three days. For longer storage, freeze them as described earlier. Thaw before serving, and they will taste just as fresh!
Is Whole Wheat flour suitable for making Homemade Pita Bread?
Absolutely! Whole wheat flour is an excellent alternative when making Homemade Pita Bread. It adds more fiber and nutrients compared to all-purpose flour while still allowing you to create delicious pitas. Just remember that using whole wheat flour may require slightly more water due to its higher absorbency.
How do I know if my yeast is active?
To check if your yeast is active while preparing Homemade Pita Bread, mix it with warm water and sugar (about one teaspoon). Let it sit for about five to ten minutes; if it bubbles up and forms foam on top, your yeast is active and ready to use! If nothing happens after this time, consider using fresh yeast instead.

Homemade Pita Bread
- Prep Time: 15 minutes
- Cook Time: 15 minutes
- Total Time: 30 minutes
- Yield: Makes 8 servings 1x
- Category: Main
- Method: Baking
- Cuisine: Mediterranean
Description
Homemade pita bread is a warm, fluffy delight that elevates any meal. Fresh out of the oven, it’s perfect for dipping, stuffing, or enjoying alongside your favorite dishes. With just a handful of simple ingredients and easy-to-follow steps, you can create this irresistible bread that will impress family and friends alike.
Ingredients
- 3 cups all-purpose flour
- 2 teaspoons active dry yeast
- 1 cup warm water (110°F/43°C)
- 2 tablespoons olive oil
- 1 teaspoon salt
Instructions
- 1. Activate the Yeast: In a small bowl, combine warm water and yeast. Let it sit for 5-10 minutes until frothy.
- 2. Prepare the Dough: In a large bowl, mix flour and salt. Create a well in the center and add the yeast mixture and olive oil. Stir until shaggy dough forms.
- 3. Knead: Transfer dough to a floured surface and knead for 8-10 minutes until smooth.
- 4. Let It Rise: Place kneaded dough in a greased bowl, cover with a damp cloth, and let it rise in a warm place for about 1 hour until doubled.
- 5. Shape Pitas: Punch down the dough, divide into 8 portions, roll into balls, and flatten into discs about 1/4 inch thick.
- 6. Bake: Preheat oven to 475°F (245°C). Bake each disc for 3-5 minutes until puffed and lightly golden.
Nutrition
- Serving Size: 1 pita (60g)
- Calories: 165
- Sugar: 0g
- Sodium: 150mg
- Fat: 3g
- Saturated Fat: 0.5g
- Unsaturated Fat: 2g
- Trans Fat: 0g
- Carbohydrates: 30g
- Fiber: 1g
- Protein: 5g
- Cholesterol: 0mg
Keywords: - For added flavor, try using whole wheat flour instead of all-purpose. - Store leftover pitas in an airtight container at room temperature for up to three days or freeze for longer storage.


Leave a Comment